

Kitchen Appliance Garage Design: The Complete Indian Guide
Kitchen appliance garage design refers to a built-in countertop-level or wall-mounted cabinet in a modular kitchen that conceals small appliances, mixer-grinders, air fryers, OTGs, coffee machines, behind a shutter mechanism while keeping them plugged in and ready to use. A well-designed appliance garage needs a minimum cabinet depth of 15–18 inches, dedicated 16A or 10A sockets matched to each appliance’s wattage, at least 4 inches of rear clearance for heat dissipation, and moisture-resistant materials like HDHMR or BWP plywood, especially in humid climates such as Dehradun or Rishikesh.
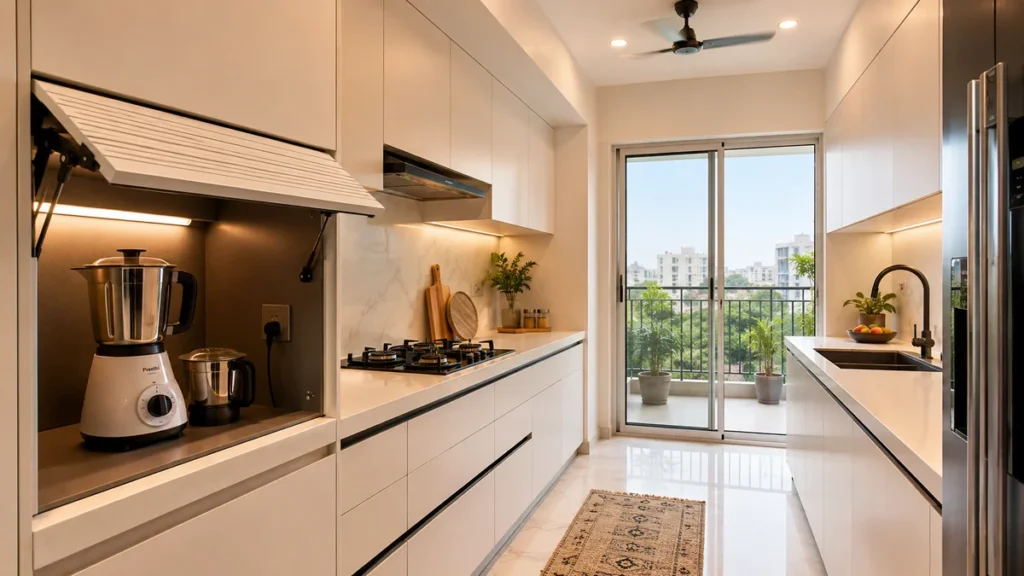
Why More Indian Kitchens Are Getting Appliance Garages in 2026
After installing modular kitchens across Dehradun’s hill-facing apartments, Noida’s high-rise flats, and family homes in Haridwar and Roorkee, one conversation keeps coming up, not about layouts, not about finishes, but about appliances.
Specifically: “Where do we put all of this?”
A standard Indian kitchen today includes a 750W–1000W mixer-grinder, an air fryer, an OTG, an electric kettle, and often a coffee machine. They all live on the countertop. They all collect grease. And they all make a kitchen that could look clean feel permanently cluttered.
That’s where the appliance garage comes in. Not a luxury add-on for premium kitchens, but a practical storage decision that pays off the first morning you use it. This guide covers everything: the right door mechanism for your kitchen, exact dimensions for Indian appliances, electrical planning, materials, costs in INR, and design considerations for different cities across North India.
Get started with Beautiful Homes
For expert design consultation, send us your details and we’ll schedule a call
What Is a Kitchen Appliance Garage, Exactly?
A kitchen appliance garage is a dedicated cabinet section , typically sitting at countertop level between the base cabinet surface and the underside of the overhead wall cabinets , designed to house small appliances behind a closing shutter. When the shutter opens, the appliances are ready to use. When it closes, the counter looks clean.
Think of it like a garage door for your kitchen: the appliance stays “parked” inside with power connected, ready the moment you need it.
This is different from a standard cabinet with a hinged door. A hinged door swings out toward you and blocks access while the appliance is in use. An appliance garage mechanism , whether it rolls up, slides sideways, or lifts upward , gets out of the way completely. That’s the functional difference that makes it worth the extra planning.
An appliance garage for a mixer-grinder in a modular kitchen, specifically, needs to account for the vibration of a 1000W motor and the additional height of a wet jar attachment. Most standard cabinets get this wrong. Getting it right is what this guide is about.
Which Door Mechanism Is Right for Your Appliance Garage?
The door mechanism is the most consequential decision in appliance garage design. Choose the wrong one, and you’ll either run out of clearance space or open the shutter 40 times a day and wish you hadn’t.
There are four main options used in Indian modular kitchens. Each has a specific use case.
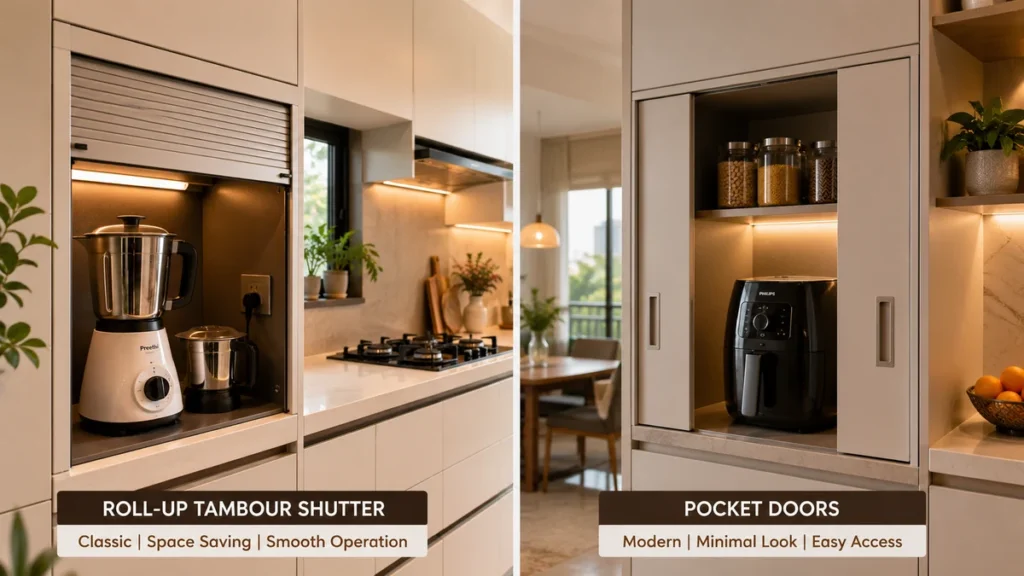
Tambour Doors (Roll-Up Shutters): Best for Compact Kitchens
A tambour door is made of thin horizontal slats, either PVC or aluminium, joined together to form a flexible shutter that rolls upward along a curved track, much like a roll-up garage door scaled down to cabinet size. When open, the slats disappear into the top of the cabinet housing. Nothing protrudes forward.
This is why tambour doors are so useful in small kitchen designs in Indian apartments. They don’t require any clearance space in front of the cabinet to open. A 500mm parallel kitchen or a tight L-shaped kitchen in a Noida apartment can use a tambour door where no other mechanism fits.
Aluminium vs PVC tambour slats: Aluminium runs smoother, holds up longer in humid environments like Dehradun, and resists the mild warping that PVC can develop near steam-emitting appliances. PVC is cheaper upfront, roughly ₹4,000–₹7,000 for a tambour kit versus ₹9,000–₹15,000 for an aluminium equivalent, but in kitchens exposed to Uttarakhand’s seasonal moisture, aluminium is worth the difference. PVC tambour tracks can swell and stick after two or three monsoons if the enclosure is not properly sealed.
When tambour is NOT the right choice: If the cabinet interior is narrow or the appliance (like a large air fryer) comes very close to the shutter track when in use, a tambour door can be awkward to operate without moving the appliance first.
Pocket Doors (Slide-In Lateral Systems): Best for Wide Cabinets
A pocket door slides horizontally when opened, retracting into the side walls of the cabinet housing. Think of two doors that slide in opposite directions and disappear into the cabinet body. The result is a completely clear opening with zero visual obstruction.
This is the cleanest-looking mechanism available, and it’s why most handleless, seamless kitchen designs in Noida’s premium apartments use pocket door systems. Hardware from Hafele’s FreeSpace fold mechanism is commonly installed in this category.
The trade-off: Pocket doors consume 50–75mm of usable cabinet width on each side for the housing rails; in a 600mm cabinet, that eats 100–150mm of interior space. Plan for this before finalizing the cabinet width.
When pocket doors are NOT the right choice: In kitchens with total countertop runs under 2 metres, where every centimetre counts, the lateral space consumed by the mechanism can be a genuine problem.
Lift-Up and Bi-Fold Flap Doors: Best for Eye-Level Positions
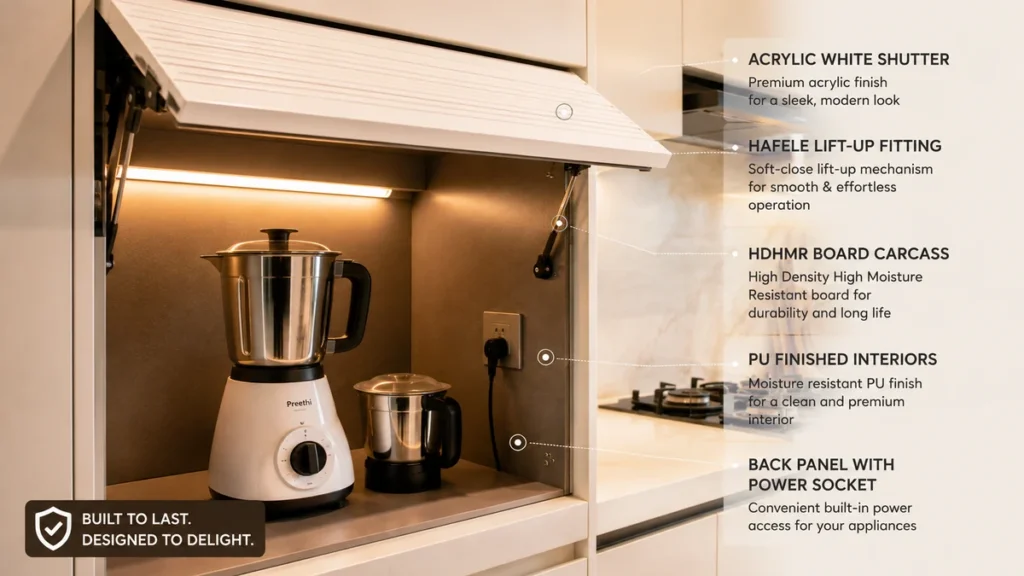
Lift-up mechanisms (hydraulic or gas-strut-assisted) open upward and stay there while the appliance is in use. Blum’s Aventos series and Hafele’s Free Flap range are widely stocked in India for this category. These are particularly suited to appliance garages built into mid-tower units or upper wall cabinets rather than countertop-level positions.
The hydraulic strut means the door opens and stays up with one hand, no need to prop anything, no risk of the door falling while you’re using the appliance underneath. For eye-level garages housing a coffee machine or microwave, this is the most ergonomic option.
Weight rating matters: Check that the lift mechanism is rated for the door weight. A heavy acrylic shutter panel on an underpowered gas strut will not stay up. Blum Aventos HS and HF systems are rated by door weight range , confirm this with your kitchen supplier before specifying.
Swing Doors with Concealed Hinges: Budget-Friendly but with Limitations
A standard cabinet door with a soft-close concealed Hafele hinge is the entry-level alternative. It costs the least and is familiar to any carpenter. The limitation is clearance: a swing door needs open space in front of the cabinet to open fully. In a galley or parallel kitchen layout with limited aisle width, a swing door on an appliance cabinet is operationally frustrating.
The honest assessment: If budget is genuinely tight, a swing door on a well-planned appliance cabinet works. But it’s worth knowing upfront that the mechanism itself is doing less work than a tambour or pocket system; you’re paying less and getting less.
Door Type | Best For | Space Needed | Approx. Cost (India) | Humidity Resistance |
Tambour (Aluminium) | Compact parallel & L-kitchens | No front clearance | ₹9,000–₹15,000 | High |
Tambour (PVC) | Budget builds, dry climates | No front clearance | ₹4,000–₹7,000 | Moderate |
Pocket Door | Wide luxury kitchens | 50–75mm per side | ₹18,000–₹35,000+ | High |
Lift-Up (Blum/Hafele) | Eye-level/tower positions | Overhead clearance | ₹12,000–₹28,000 | High |
Swing/Concealed Hinge | Budget builds with space | Full door swing | ₹2,000–₹5,000 | Moderate |
Costs are approximate hardware-only figures for the Indian market and exclude carpentry and installation. Confirm current pricing with suppliers.
How Deep Should an Appliance Garage Be? Dimensions for Indian Appliances
This is the most-searched technical question about appliance garage design, and the answer varies by appliance more than most guides acknowledge.
The standard kitchen counter depth in India is 600mm (roughly 24 inches). An appliance garage built into that counter runs from the countertop surface up to the underside of the overhead cabinets, typically 450 mm to 600 mm of height clearance. But depth is where mistakes happen.
Minimum depth for a mixer-grinder: A standard 750W–1000W Indian mixer-grinder with a wet jar attached measures approximately 380–400mm from base to jar top. You need at minimum 420mm of interior cabinet height (measured from the countertop surface to the top of the shutter track) to fit the jar comfortably without tilting. If you’re storing the mixer with the jar on during use, add 50mm of clearance on top.
Standard reference dimensions for common Indian appliances:
Appliance | Approx. Footprint | Height With Jar/Lid | Recommended Min. Cabinet Height |
Mixer-grinder (1.5L jar) | 280 × 180mm | 380–420mm | 470mm |
Air fryer (medium, 4L) | 320 × 310mm | 360–380mm | 430mm |
Electric kettle (1.5L) | 180 × 180mm | 280mm | 330mm |
OTG (28L) | 450 × 320mm | 340mm | 390mm |
Coffee machine (drip) | 260 × 200mm | 380mm | 430mm |
Toaster (4-slice) | 360 × 190mm | 210mm | 260mm |
Dimensions are approximate category averages. Always verify against the exact model spec sheet before finalising cabinet dimensions.
For a corner appliance garage layout , used in L-shaped kitchen designs or U-shaped kitchens to activate dead corner space , the standard approach is a diagonal corner unit with a 45-degree face. Width can run 600–900mm depending on the depth of adjoining countertops. A curved tambour door or a bi-fold shutter works particularly well here.
The depth most guides get wrong: The interior cabinet depth (front to back) needs to match the appliance footprint plus at least 80–100mm of rear clearance for ventilation and power sockets. A 600mm countertop depth provides only about 550mm of usable interior depth after the cabinet wall. For a large OTG or air fryer, this is tight. Plan 100mm rear clearance explicitly in the design brief, and don’t let your kitchen planner reduce it to save cabinet cost.
Electrical Planning for an Appliance Garage: Sockets, Load, and Safety
This is the section most Indian kitchen guides skip entirely. It’s also the most important one for safety and long-term functionality.
How many amps does each appliance need?
Not all appliances draw the same current, and using the wrong socket for a high-wattage appliance is a genuine fire hazard, not a theoretical one.
In India, two socket types are relevant to appliance garages:
- 5A/6A sockets (standard three-pin): Handle appliances up to ~1,250 watts. Suitable for electric kettles, toasters, and small coffee machines.
- 16A sockets (heavy-duty three-pin): Handle up to ~3,500 watts. Required for mixer-grinders above 750W, air fryers, OTGs, and induction cooktops.
A well-established rule in Indian appliance electrical planning: if the appliance has a heating element or a high-power motor, give it a dedicated 16A point. Heating elements and motors draw consistent high current that overloads 5A wiring over time.
Appliance garage socket placement checklist:
- Place sockets on the rear wall of the cabinet interior, 150–200mm above the countertop surface, this keeps the socket accessible without moving the appliance and away from splash zones.
- Per the Bureau of Indian Standards (IS 1293), sockets near wet areas (within 600mm of a sink edge) must incorporate ELCD/RCD protection.
- Install a master isolation switch outside the appliance garage, on the cabinet face or adjacent wall, so the entire cabinet’s power can be cut from outside without opening the shutter.
- Route wiring through the cabinet rear panel during kitchen manufacturing, not as an afterthought during installation. Retrofitting cables into installed cabinets requires drilling through panels and looks poor.
- Plan 2–3 sockets inside the garage, not just one. If a second appliance is added later, the wiring is already there.
Expert Tip: In Bhumim’s kitchen installations across Noida and Dehradun, the single most common retrofit request we get after handover is “can you add another socket inside the appliance cabinet.” Plan two from the start. The wiring cost difference is negligible compared to opening up a finished cabinet later.
Air Fryer Safety in a Closed Cabinet, What You Must Know
An air fryer generates exhaust temperatures of 60°C–90°C at its rear vent during operation. Placing an air fryer in a closed appliance garage without adequate ventilation is a laminate-warping, potentially fire-risk decision.
Never operate an air fryer with the appliance garage shutter fully closed. The door must be open while the appliance is running, this applies to all heat-generating appliances, including OTGs and coffee machines with steam.
For an appliance garage designed to house an air fryer, add:
- A minimum 100mm (4 inches) of rear clearance between the appliance vent and the cabinet back wall
- Ventilation mesh cutouts (minimum 50mm × 100mm) in the upper panel or rear wall
- A heat-resistant HPL (High Pressure Laminate) finish or stainless steel liner on the interior surfaces behind and above the air fryer
Choosing the Right Material for Your Appliance Garage Cabinet
The carcass material decision is where Indian climate context separates a long-lasting appliance garage from one that swells and warps within two monsoon seasons.
HDHMR vs BWP Plywood vs MDF: What Actually Lasts
HDHMR (High-Density HMR Board): This is the recommended carcass material for most North Indian kitchen appliance garages, including those in Dehradun, Haridwar, and Rishikesh, cities with high seasonal humidity swings. HDHMR resists moisture significantly better than standard MDF (approximately 30% better water-swelling resistance, per technical guidance from Indian wood panel industry bodies) and costs less than BWP marine plywood while still holding screws and hinges well.
BWP Plywood (IS:710 grade): The benchmark for durability. If the appliance garage is positioned near a sink, in a ground-floor kitchen that sees regular moisture, or in a riverside location like Rishikesh, BWP plywood is the most reliable choice. It costs more than HDHMR but is the material Bhumim uses for base cabinet carcasses in high-humidity applications.
Standard MDF: Fine for dry-area shutters and painted finishes. Not suitable for appliance garage carcasses in kitchens exposed to cooking steam or coastal/foothill humidity. MDF near heat-emitting appliances absorbs moisture from steam and swells at joints, particularly around hinges and runners, where the structural integrity matters most.
Hidden appliance cabinet for small kitchens in Dehradun and Rishikesh specifically should use HDHMR or BWP carcasses without exception. The cost difference between HDHMR and MDF on a single appliance garage unit is typically ₹2,000–₹4,000. That’s far less than a repair or replacement.
Shutter Finishes That Hold Up in Kitchen Environments
- Acrylic shutters: Sleek, high-gloss, easy to clean. Susceptible to scratching, avoid using cleaning pads on acrylic surfaces.
- High-Pressure Laminate (HPL) shutters: More scratch-resistant than acrylic, available in matte and textured finishes, handles humidity better.
- PU Paint finish on MDF: Good for painted shutters. Choose exterior-grade paint application for cabinet shutters near cooking zones.
- Aluminium frame shutters with glass panel: Durable, easy to clean, and moisture-proof. A practical option for the appliance garage shutter if the interior is to be visible.
Cost of an Appliance Garage in Indian Modular Kitchens
The total cost of an appliance garage in India depends on three things: the door mechanism, the carcass material, and whether it is being built as part of a new modular kitchen or retrofitted into an existing one.
Approximate cost tiers for 2026 (hardware + basic carpentry; not a full kitchen quote):
Build Type | Mechanism | Material | Approx. Total Cost (INR) |
Entry-level | PVC tambour or swing door | Commercial particle board | ₹6,000–₹12,000 |
Mid-range | Aluminium tambour or lift-up | HDHMR board + HPL shutter | ₹18,000–₹32,000 |
Upper-mid | Pocket door (Hafele FreeSpace) | 18mm HDHMR + acrylic shutter | ₹28,000–₹45,000 |
High-specification | Blum Aventos lift-up or Hafele FreeSpace | 18mm BWP ply + glass panel | ₹40,000–₹70,000+ |
Labour and electrical wiring are additional. Installation labour for an appliance garage unit in Dehradun and NCR cities typically runs ₹2,500–₹6,000 depending on mechanism complexity.
City-specific notes:
In Dehradun, independent bungalow kitchens on Rajpur Road and Sahastradhara Road tend to favour HDHMR or BWP carcasses given monsoon humidity, and mid-to-upper-mid mechanisms are common choices.
In Noida and Ghaziabad, high-rise apartment kitchens often have tighter counter spaces. Aluminium tambour doors are popular here because they need no front clearance. Pocket doors are increasingly common in Expressway sector apartments where kitchen aesthetics are a higher priority.
In Rishikesh, boutique homestay kitchens and riverside villa renovations typically request moisture-sealed HDHMR with stainless-steel hardware because of river proximity and the need for longer service intervals.
In Roorkee and Haridwar, cost-efficiency is a stronger driver than in Dehradun. HDHMR carcasses with aluminium tambour mechanisms hit the right balance here.
A practical reality: for a new modular kitchen from Bhumim, the appliance garage is designed and manufactured as an integrated unit, the cabinet dimensions, shutter track, socket positions, and ventilation openings are coordinated in the factory before delivery. This is fundamentally different from asking a local carpenter to add a tambour shutter to an existing cabinet on-site. The tolerances matter, especially for tambour and pocket door systems, which require millimetre-precise track alignment to operate smoothly.
How to Add an Appliance Garage to an Existing Kitchen
Not every homeowner is rebuilding from scratch. A significant number of Quora and Reddit queries on this topic come from people with installed kitchens who want to add an appliance garage without ripping out their granite countertop or removing wall cabinets.
The realistic options:
Option 1, Countertop-resting retrofit kit: A freestanding tambour-door unit that sits on the countertop between the counter surface and the upper cabinet underside. It doesn’t require any structural modification to the existing kitchen. Standard widths are 600mm, 750mm, and 900mm. The limitation is that the unit takes up countertop footprint, but it does exactly what a built-in version does functionally.
Option 2, Convert an existing cabinet section: If there is an existing standard cabinet in the appliance zone, a carpenter can remove the hinged door, route side tracks into the interior walls, and install a tambour mechanism. This works well when the existing cabinet depth and height are sufficient. The key check: is the interior height at least 450mm above the countertop surface? If yes, a tambour retrofit is possible.
Option 3, Electrical extension inside existing cabinets: If the cabinet conversion is done but there is no internal socket, a flush-mounted pop-up power strip (grounded, rated for kitchen use) can be routed through the back panel to a new socket point without breaking tiles. Plan this with your electrician before opening any walls.
What a retrofit cannot do easily: replace an existing tambour track with a pocket door mechanism. Pocket doors require specific side-wall thickness for the housing rails. This is a structural modification that works best when done during the original kitchen build.
City-Specific Design Notes: North India's Appliance Garage Considerations
Indian cities in the Bhumim service area have distinct challenges that affect appliance garage design beyond just aesthetics.
Dehradun: Hill-facing flats and villas on the Mussoorie road stretch experience high seasonal humidity, August monsoon peaks can push interior relative humidity above 80% without good ventilation. This means unsealed wood tracks in tambour systems can swell. Specify anodised aluminium tracks, not raw wood or PVC, in appliance garages here.
Haridwar: River-adjacent homes in Kankhal and Jwalapur see persistent ground-level moisture. Stainless-steel SS304 grade hardware (hinges, channel runners) resists rust better than standard plated hardware in these conditions. Tambour tracks should be anodised aluminium.
Rishikesh: Boutique homestay and yoga retreat kitchens frequently have compact galley or parallel layouts. Tambour doors are the default choice because of space constraints. The compact footprint of the Rishikesh kitchen also means the appliance garage often needs to serve dual purpose, housing both a mixer-grinder and an electric kettle in a single 750mm unit.
Noida/Ghaziabad: High-rise apartments in sectors like 150 (Noida) and Indirapuram (Ghaziabad) often have kitchens under 8×10 feet. Handleless pocket-door appliance garages fit the seamless aesthetic that most buyers here prefer. Push-to-open mechanisms eliminate the need for handles, keeping the kitchen looking flush when closed.
An L-shaped modular kitchen in these apartments often has a natural dead-corner space at the junction of the two walls that suits a corner appliance garage unit well; a 45-degree diagonal tambour unit makes that otherwise-wasted corner functional.
Appliance Garage Design: A Quick Checklist Before You Finalise
Before confirming your appliance garage design with your kitchen manufacturer, run through these:
- Measured the actual appliance dimensions (with jar, lid, or basket in place), not estimated
- Cabinet height is at least 100mm taller than the tallest appliance with attachment
- Cabinet depth allows 100mm rear clearance behind the appliance
- 16A socket planned for any appliance over 750W
- Master isolation switch planned outside the cabinet
- Socket placed at least 600mm from the sink edge
- Ventilation provision for heat-emitting appliances (mesh cutout or open rear)
- Heavy-duty pull-out tray specified for mixer-grinder (rated 35kg minimum)
- Carcass material is HDHMR or BWP plywood (not standard MDF) in humid zones
- Tambour track material is anodised aluminium for coastal or foothill climates
- Door mechanism tested in the showroom before committing
For a parallel kitchen design where the working counter is narrow, confirm that the mechanism you choose needs zero front clearance before building it.
Common Mistakes to Avoid in Appliance Garage Planning
- Designing to the appliance you currently own, not the appliance you’ll buy next: An air fryer is a common “next purchase” for Indian families who already have a mixer-grinder. Build for what’s coming, not just what’s here today.
- Forgetting to plan pull-out trays for heavy appliances: A 1000W mixer-grinder weighs 4–6 kg. Lifting it from the back of a cabinet every day is ergonomically poor. A heavy-duty pull-out shelf, rated for at least 35kg and using full-extension telescopic runners, lets the appliance slide to the front before lifting.
- Using the same socket for two high-wattage appliances: Two 16A appliances on a shared circuit can trip the MCB every time both run simultaneously. Give each heating-element appliance its own circuit.
- Ignoring vibration from the mixer-grinder: A 1000W motor vibrating inside an enclosed cabinet transmits that vibration to the shelf and shutter track. Soft-stop drawer slides with bottom-mounted locking clips reduce this significantly. Without them, the tambour track can develop wobble over months of use.
- Skipping the ventilation plan: The most common regret Bhumim encounters when evaluating older kitchens for renovation is no ventilation cutout in the appliance garage, causing heat buildup from OTGs and air fryers that warps the laminate over time.
Frequently Asked Questions
An appliance garage is a dedicated countertop-level or wall-mounted cabinet in a modular kitchen designed to store and conceal small appliances, mixer-grinders, air fryers, OTGs, and kettles behind a rolling, sliding, or lifting door mechanism. The appliances stay plugged in inside the cabinet and are accessible when the shutter opens, without needing to be moved to a different counter position each time.
An appliance garage for an Indian kitchen should have a minimum interior depth of 15–18 inches (380–460mm) from front to back. This accommodates most standard mixer-grinders and air fryers. For OTGs, which have a larger footprint of 450mm or more, a depth of 500–550mm is preferable. Always add at least 100mm of rear clearance for sockets and heat ventilation, this is separate from the appliance footprint.
No. An air fryer should never be operated with the appliance garage shutter fully closed. Its rear vent exhausts air at 60°C–90°C, which builds dangerous heat inside an enclosed cabinet and can warp laminates or trigger a fire hazard. The garage door must remain fully open during operation. Design the garage with ventilation mesh cutouts and a heat-resistant interior liner if the air fryer is a permanent resident.
For compact kitchens, small apartments in Noida, parallel kitchens in Rishikesh, or straight-layout kitchens in Roorkee, an aluminium tambour (roll-up) door is the most practical mechanism. It requires no front clearance to open, costs less than a pocket door system, and holds up well in humid conditions if aluminium tracks are specified. Pocket doors are better for wider cabinets in larger kitchens where the lateral housing space won’t be missed.
A combination of socket types is best: a 16A grounded socket for high-wattage appliances (mixer-grinders above 750W, air fryers, OTGs), and one or two 6A/5A sockets for lower-draw appliances (kettles, toasters, coffee machines). All sockets inside a cabinet should have switch-controlled isolation, and a master isolation switch accessible from outside the cabinet adds an important safety layer. Sockets must sit at least 600mm from any sink edge per BIS guidelines.
In Dehradun, a basic appliance garage with PVC tambour shutter and commercial board carcass starts around ₹6,000–₹12,000. A mid-range unit with aluminium tambour and HDHMR board runs ₹18,000–₹32,000. High-specification imported pocket-door or Blum Aventos lift-up systems in BWP plywood can reach ₹50,000–₹70,000 for the hardware and cabinet combined. In Noida and Ghaziabad, pricing is broadly similar, with installation labour adding ₹3,000–₹6,000 depending on the mechanism. These are 2026 approximate ranges; confirm current pricing with your kitchen manufacturer.
Yes, but only if aluminium tambour slats and anodised aluminium tracks are specified. PVC tambour systems are susceptible to swelling in high-humidity environments and can jam after one or two monsoon seasons in foothill cities. HDHMR or BWP plywood carcasses further protect against moisture-related warping inside the cabinet housing.
Yes, with some limitations. If your existing kitchen has a standard upper-cabinet-to-countertop gap of at least 450mm and a countertop depth of 600mm, a freestanding tambour kit can be placed directly on the counter without any structural modification. Converting an existing hinged-door cabinet to a tambour mechanism is also feasible if the interior dimensions are sufficient. Pocket door systems are harder to retrofit, they require side-wall modification and are best planned during the original kitchen build.
Mount the mixer-grinder on a heavy-duty pull-out tray with a full-extension telescopic runner rated for at least 35kg. Choose a runner with a soft-stop mechanism that includes bottom-mounted locking clips, this prevents the tray from moving during operation. Anti-vibration rubber pads under the appliance base also reduce the transmission of motor vibration to the shutter track.
Key Takeaways
- An appliance garage stores and conceals countertop appliances behind a rolling, sliding, or lifting shutter, keeping them plugged in and accessible without permanent counter clutter.
- The four main door mechanisms are tambour (roll-up), pocket door (slide-in), lift-up (hydraulic), and swing door. Tambour aluminium systems suit most compact Indian kitchens; pocket doors work best in wider, premium setups.
- Minimum interior height is 450–470mm above the countertop for a mixer-grinder with jar; 430mm for a medium air fryer; always add 100mm of rear clearance for sockets and ventilation.
- Heat-emitting appliances (air fryers, OTGs) must never be operated with the garage shutter closed. Plan ventilation cutouts into the cabinet design from the start.
- Use 16A sockets for appliances above 750W; 5A/6A for lower-draw appliances. Install a master isolation switch outside the cabinet.
- In humid climates (Dehradun, Rishikesh, Haridwar), specify HDHMR or BWP plywood (IS:710) for carcasses and anodised aluminium tambour tracks. Standard MDF absorbs moisture and warps.
- Total cost ranges from ₹6,000–₹12,000 for a basic entry build to ₹50,000–₹70,000+ for a high-specification imported hardware system.
- Retrofit options exist for existing kitchens, including countertop-resting tambour kits that need no structural modification.
Conclusion: The Appliance Garage Is Not an Upgrade, It's Good Planning
That cluttered countertop at the start of this guide? Three appliances out at all times, visible grease on the mixer-grinder lid, and not enough prep space to roll a roti properly- that’s not a design flaw in the kitchen. It’s a planning gap that an appliance garage solves in a single decision.
The good news is that the decision is not complicated once the dimensions, mechanism, and electrical requirements are clear. And those are now clear.
The detail that matters most is getting the dimensions right before the cabinet is built, particularly rear clearance for ventilation and socket placement, because fixing these after installation is expensive and disruptive. Everything else, from door style to shutter finish, follows naturally from the space you have and the appliances you cook with daily.
If you are planning a new modular kitchen in Dehradun or across the Bhumim service cities, Haridwar, Rishikesh, Roorkee, Noida, and Ghaziabad, Bhumim designs and manufactures the appliance garage as an integrated part of the kitchen unit, not an afterthought. The track, the socket routing, the pull-out tray, and the ventilation clearance are coordinated at the factory level before anything reaches your home.
Book a free 3D kitchen design consultation with Bhumim and see your appliance garage designed to your actual appliances, your kitchen dimensions, and your city’s climate conditions, before any manufacturing begins.
About This Article
Published by: Bhumim India Private Limited-Modular Kitchen Manufacturer & Installer, Dehradun
GST: 05AAOCB1784F1ZM | ISO 9001:2015 Certified
Service Areas: Dehradun · Haridwar · Rishikesh · Roorkee · Noida · Ghaziabad
Contact: 08044630777 | hello@bhumim.com
Note: This article is written from Bhumim’s on-ground manufacturing and installation experience. All material recommendations are based on what we use in real kitchens across our service areas.